With the upsurge in social media and blogging influencers, comes the need to begin marketing yourself as a brand. After years of being a professional marketing writer and blogger, I finally jumped onboard and created my own media kit – yes, I’m a bit of a procrastinator. But if you are serious about standing out as a brand, you need to create one that will impress!
Contents
What is a Media Kit?
Let’s start at the beginning by defining what a media kit is. A media kit is basically a combination of a CV (resume) and portfolio. It should contain all the necessary information about you and your brand. It is what you will be giving potential companies and brands that you’re looking to collaborate with.
What is Included in a Media Kit?
Keeping in mind that your media kit is what you will be sending out for potential collaborations, your kit should contain all the information relative to you and your services. It should include info such as your bio, your audience demographics, statistics (if you have them), special skills you offer, brands you’ve worked with, photos and contact information. Sending out a media kit to brands shows them that you are professional and serious about your work.
Creating a Media Kit
Making your media kit takes time and a creative spirit, but keep in mind that your media kit will be what potential brands SEE FIRST about you. You want it to look professional and stand out.
Tip: Set out a specific period of time to just focus on creating your kit. Doing it ‘here and there’ will just delay your creative juices.
Personalizing Your Media Kit
There are many applications to build it on, such as Illustrator or Photoshop, but if you don’t want to spend the money on this type of software, you can also make it on FREE sites, such as Canva. Canva has some great tools and templates for creating a media kit.
Once you’ve decided on a tool to use, the first thing you want is to pick a template that will fit your brand’s look and feel. You’ll want to keep the same color scheme, fonts and theme that your brand uses. Personalizing it with your information is the next step. As we mentioned earlier, there are specific elements that you should include.
Tip: Making your kit personal, and not generic, will come through to your potential collaborators.
Bio (About You)
Your bio should include information about what you do and WHY you do it! Give marketers an insight into who you are and why you are a good fit for their campaign. Help marketers get to know the person behind the screen by adding the special skills you offer.
Tip: Write down a list of qualities that make your brand unique to your niche. Choose one or two that stand out as who you are as a brand.
Mission Statement
Along with your bio, you should include one clear, simple mission statement that gives the overall idea about what you provide. It should be short and sweet and to the point. Start with the simple equation below and make it personal to your brand.
Tip: Here’s an example equation: [I/WE + WHAT YOU PROVIDE + FOR WHO]
Services
What specific services do you offer? You should be telling brands exactly what you provide and how your services can help their brand. Do you write? Provide professional photography services? Vlogs?
Tip: If you’re not sure what services to provide, take a look at other media kits in your genre to get some inspiration.
Audience Demographic
Your audience gives potential collaborators insights into who you will be reaching and if your audience aligns with their brand, target market – and if you’re a good fit. Analytics can be found in Google Analytics for websites or blogs and inside the social media outlets you’re using.
Tip: You can find all your Instagram demographic numbers under the ‘Insights/Audience’ tab.
Statistics
Displaying your statistics can be a great way to puff yourself up. The important thing to remember is to choose statistics that show you in a good light. Find your strengths and use those as a basis for your numbers. If you have a large blog following, but a small Facebook one, focus on your blog statistics. If you have a small amount of followers, but a large engagement, that’s what you should feature – which was my case.
Tip: Make a list of all your possible stat numbers, from social media platforms to blogs etc, and choose the top 4-5 to feature.
Brands You’ve Worked With
Don’t be shy, this your time to brag! You want your media kit to outshine the other kits sitting and waiting to be read. Showcase the brands you’ve previously collaborated with. You want to impress potential brands in order to gain more.
Tip: If you don’t have much experience with brand collaboration, that’s ok. Just don’t make it as prominent on your kit.
Photos
Photos are extremely important, especially if you’re a visually-based brand. They will help give your media kit some kick and show the world what your brand is made of. If you’re not a visual brand – like a writer – make sure to at least have a great headshot to include.
Tip: Go through your Instagram feed and choose a few of your highest engaging photos to feature.
Contact Info
Your media kit should include your email address, website and social media handles. The ultimate goal is to hear back from the brand you’re reaching out to.
Media Kit Length
Once you’ve gathered all the information you want to place inside, it’s time to start creating. Strategically placing all your information in a creative way can be challenging, but if that’s not your forte, choose a template to help you out. Ideally, it should be 2-3 pages. Short and sweet.
Example Media Kit
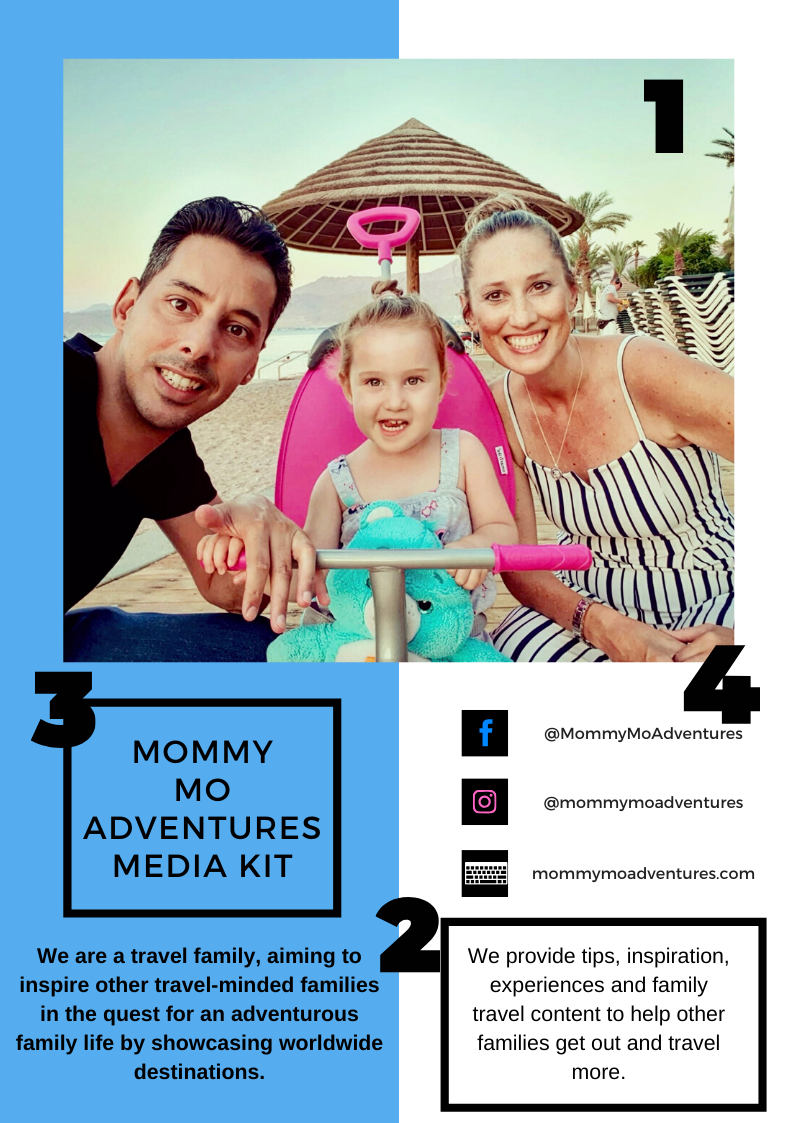
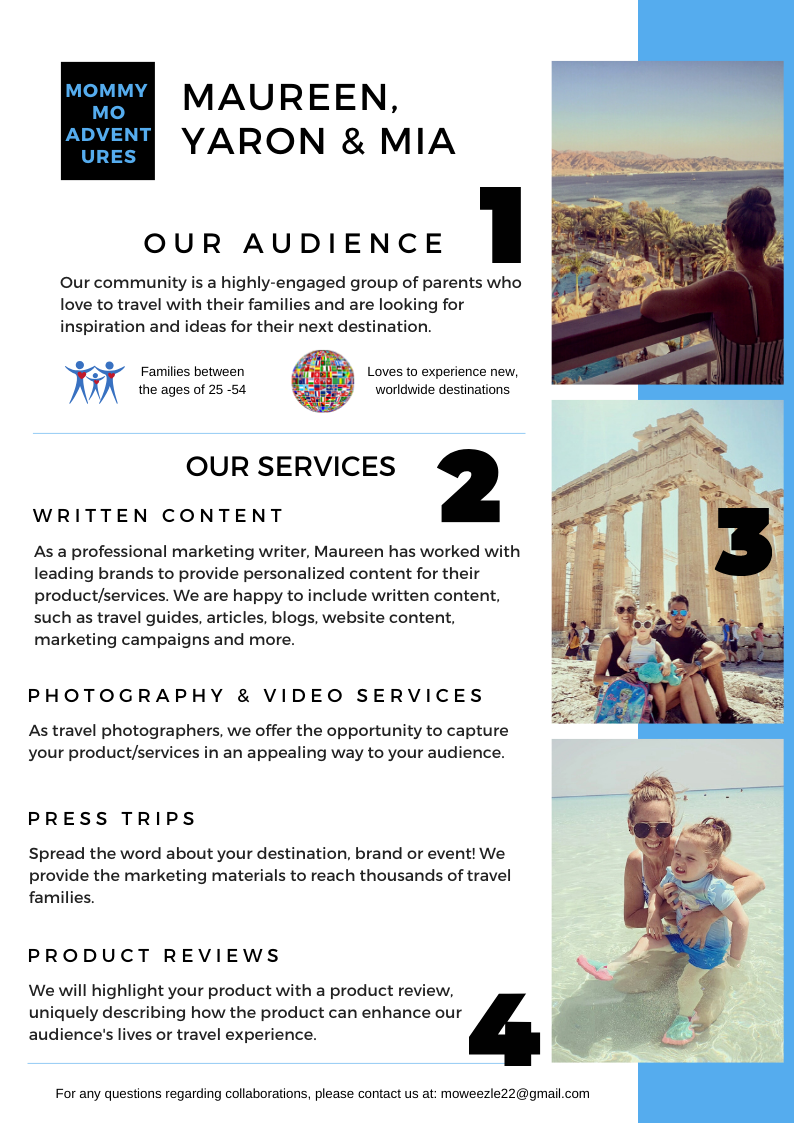
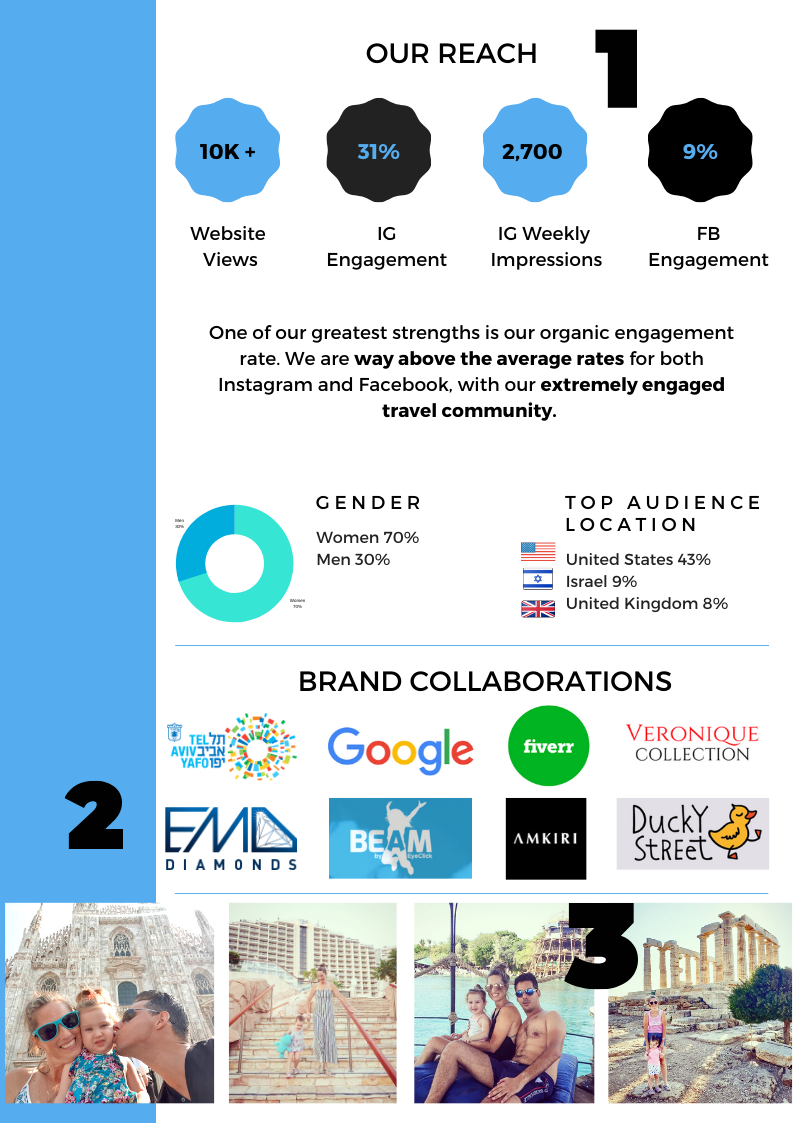
Here’s my family travel media kit as an example of what elements to include in yours. Because we are branding ourselves as family travelers, including photos is a must – which is why I decided to extend it to 3 pages instead of 2. The size of your kit will also depend on your specialization.
Page 1 is the first page potential collaborators will see, so it includes:
- Profile Pic
- Mission Statement
- Brand Colors
- Website & Social Media Handles
Page 2 includes the following information:
- Audience Demographics
- Services
- Photos
- Contact Info
Page 3 includes the following information:
- Statistics
- Brand We’ve Worked With
- More Photos
Download our Full Media Kit
If you’re just getting started and have questions about creating your kit, feel free to reach out email me! I’d love to help out as much as I can.
Pin It

Hi there! I just finished reading your article on how to make a killer media kit, and I must say, it’s an incredibly informative and helpful guide. As a fellow content creator, I understand the importance of having a strong media kit to showcase our work and attract potential partnerships and collaborations.
Your article breaks down the process of creating a media kit into clear and actionable steps. From determining your target audience and crafting a compelling bio to showcasing your best work and including relevant statistics, your guide covers all the essential components. Your tips on design and layout also provide valuable insights on how to make our media kits visually appealing and professional.
I appreciate how you’ve shared personal experiences and examples throughout the article, making it relatable and easy to understand. Your emphasis on the significance of a media kit in building relationships and securing opportunities resonated with me. It’s evident that you have a wealth of knowledge and expertise in this area.
Thank you for sharing your insights and providing a valuable resource for fellow content creators. Your article has inspired me to revisit and revamp my own media kit. Keep up the fantastic work, and I’ll be eagerly waiting for more of your informative content.
thanks! You’ve also reminded me to update mine on here – this is actually an older version of ours. 🙂
Thanks for this insightful guide on creating a media kit! As a team member behind holidaytourspackage.com, I understand the importance of effective branding and communication. Your tips will certainly help us refine our media kit to better collaborate with potential partners. A well-prepared media kit can make a huge difference, especially in the travel industry. Cheers to more success
Thanks for this insightful guide on creating a media kit! As a team member behind holidaytourspackage.com, I understand the importance of effective branding and communication. Your tips will certainly help us refine our media kit to better collaborate with potential partners. A well-prepared media kit can make a huge difference, especially in the travel industry. Cheers to more success
holidaytourspackages.com